|
|
 |
 |
 |
|

FileStar/2 File Manager: A Review, Part 4
By: Walter Metcalf
Date: 03/21/01
During the current series we are doing an extensive review of
FileStar/2, the outstanding file manager developed and maintained by
Jim Read. FileStar/2 is so powerful and rich in features that,
although we have devoted several articles to it already, many features have gone unmentioned. However, a few features--what
I have termed "macro-features"--are so important that I would be completely remiss if I did not devote some time to
them. This final article in the series is devoted to these "macro-features".
LAN Access
While this feature is not unique to FileStar/2, FileStar/2 has implemented this capability is a very easy-to-use manner.
In fact it is so easy to use, I prefer to go to remote files using FileStar/2 than to use OS/2 Warp.
Here are the steps required to access a file on a remote system.
- Make sure the file or drive you want to access on the remote system is shareable.
- Then follow the following procedure:
- Click on "Drives" in the Main Menu.
- Click on the "Lan Connect" Menu Item".
- A window will appear requesting your LAN userid and password. Enter the LAN UserID and Password assigned to your
workstation. This UserID and Password authorizes your workstation to access the LAN. (If you are already
logged onto the LAN, this window will not appear.)
- Note that a window opens containing all free drive letters plus all shareable devices on the LAN to
which you are connected.
- Select a drive from the drives in the left column.
- Scroll down in the window on the right until you see the system and drive you wish to access. Click on it,
then click on the "Connect" button.
To disconnect a file or device:
- Make sure the file/drive you wish to disconnect is NOT in use.
- Then follow the following procedure:
- Click on "Drives" in the Main Menu.
- Click on the "LAN Connections".
- From the window, click on the connection you wish to disconnect.
- Click on the "Disconnect" button.
Once you've used this facility a little, you'll find it's almost as easy to copy files to and from remote systems as it is
on your local system.
To log off the LAN, after making sure that no remote drive is in use, simply click on "Drives" in the Main Menu, and then
select "LAN Log Off". Note that "[Logged Off]" now appears in the Title of FileStar/2, replacing the LAN Domain name.
1
One characteristic of FileStar/2 that particularly adds value to the product is the presence of two built-in macro-features
that are in fact programs in their own right. They are FlexEdit and ZipView.
FlexEdit
FileEdit is such a major item that the author has spent a lot of time developing it, in addition to the time he has spent
developing FileStar/2. I have been told by the developer that it may be released as a separate product in the future.
For the present, however, it serves as the internal editor that's automatically called when you access to view or
change text files. (Click here to view the FlexEdit's main window.)
It's clear from looking at the main menu, however, that this is no ordinary internal editor of the sort provided with, say
PMMail/2000. For example, how many internal editors, provided free with a
product, have a macro generator, albeit a very simple one?
Here are some other striking features, some of which are not found in many commercial, standalone editors, much less
internal ones:
- Hex edit capability;
- The ability to print blocks of text;
- The ability to format printout on the fly;
- Macro capability;
- Automatic line formating (indenting);
- "Smart" handling of End-of-Line;
- Sophisticated Formatting comparable to Kon and MED;
- Multiple-file and window support;
- Search and Search-and-Replace operations;
- Recently used files history list;
- Add, as well as Copy, to clipboard.
It is also possible to selectively override FlexEdit so that certain files activate, for example, your own external
program when double-clicked. We'll discuss this further in the "Settings" section of this article.
It is also easy to create a Desktop icon that will activate FlexEdit and allow you to use it independently of FileStar/2.
Here's how.
Using FlexEdit by Itself
- Start FileStar/2.
- In the "Drives" and "Directories" windows, select the values corresponding to the location of the FileStar/2
directory.
- In the "Files" Window, left-click on the "FlexEdit.exe" file.
- Right-click, which displays the context menu.
- Left-click on the arrow in the WPS Object item in the context menu. This displays another short menu.
- Left-click on the "Create Program Object".
- If you wish to change any default information in the white boxes, do so.
- Left-click on the "Create" button to create an icon, which when clicked will start FlexEdit.
ZipView
-
Unlike FlexEdit, which is actually a separately .EXE file packaged with FileStar/2, ZipView is built in to FileStar/2's
regular program files. So it is not a separate application, and obviously cannot be run independently of FileStar/2.
Instead it is called either by selecting from FileStar/2 in one of the following ways:
- Selecting "ZipView" on a filename's context menu;
- Double-clicking on a file with an ".ZIP" extension; or
- Clicking on the "ZipView" tool in the Toolbar.
-
Once called, however, ZipView loads very quickly, and behaves like a separate application. It automatically lists the
contents of any .ZIP file it is called with. Then you may view the contents of the Readme and other text files contained
in the file, extract (i.e. unzip) selected or all files into whatever directory you choose. The best sequence to use
when extracting files is the following:
- Make sure the files you want to extract (unzip) are highlighted. You can select multiple files by using the
control key in the usual fashion.
- Click on the "Extract" button.
- Enter the desired target directory in the "To:" box.
- If desired, click on the "Options" button, to override the displayed unzip options.
- When satisfied with the parameters, click on the "Unzip" button.
-
To view a file within an archive, start ZipView, highlight the (text) file, and click on the "Browse" button. This will
load FlexEdit in ReadOnly mode.
-
The "Delete" button can be used to edit an archive by removing one or more files.
-
To create a new archive, in the current "Files" Window, highlight the files you wish to archive, then invoke ZipView, and
click on the "Create" button. Complete the dialogue and when you are satisfied with the parameters, press the "Zip"
button.
-
Finally, miscellaneous archive editing can be accomplished by using the "WorkDir" to extract all the files into the
fixed working directory x:\FileStar\WorkDir, and then adding, deleting, or editing files in the working directory. The
archive can then be recreated using the "Create" button.
Settings
In this section, we wish to look particularly at the Settings Notebook at SetUp | Settings.
- Cover
Page 1 of the Notebook Cover shows the Logo FileStar/2 and Company name under which it is manufactured:
Sierra HyperStar Software
Page 2 gives specific version information for FileStar/2 and lists various ways in which to contact the author.
- Options
- The "Options" tab contains a large number of customizing features. A few examples are:
- Show/not show toolbar.
- Show/not show menu.
- Default drag is a Move.2
- Open OS/2 session full-screen.
- Expand tree branch on Open
- Load Titles/Subjects - these two options control the loading and displaying of Longname EAs (Titles) and
Subject EAs.
- Default viewer is internal/external - these options allow you to override calling FlexEdit to view files.
- Controls - This page of options allows precise control of certain aspects of FileStar/2's operation.
- Detail View - allows precise control over display of File information in "Files" windows.
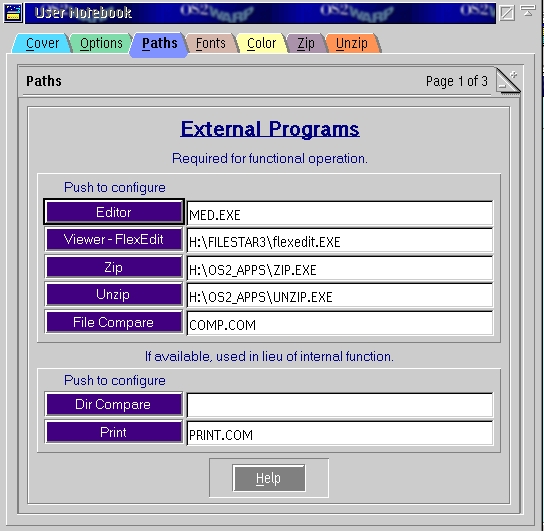
- Paths
This section provides a place to specify external programs such as the location of ZIP and UNZIP, as well as any
external programs you may wish to use with FileStar/2 such as Netscape and an external editor.
[ Click to expand image.]
- ZIP is a typical simple example. Click on the first button; type the fully specified filename of ZIP into
the "Executable program" box.
- Add any switches you wish to always have set as default (you can also click on the "Options" button to do this).
- Type in "Zip" or whatever label you want to appear on the button on the Notebook page, click on the
"Close" button.
- User Defined Associations
The second and third Options pages are special cases of External Programs, and provide a richer and more
complex facility for selective invocation of external programs. These are especially useful in cases in which
the user has written a special program to handle files with a special extension.
- To set up Netscape, click on a blank button;
- Type "Netscape.exe" into the "Executable Program" box.
- Type "*.HTM, *.HTML" into the " File Filters" box.
- Type "-browser -l en_US" into the "Switches" box.
- Type "Browser" into the "Label" box.
- Click on the "Close" button.
Toolbar
Before we leave FileStar/2, we must take a very brief look at the Toolbar, because it contains some important features that
set this Toolbar apart from any others I have seen.
- Large number of tools available.
- Toolbar is three dimensional--some tools have drop down lists revealing additional tools.
- Tools can optionally have contain text descriptions, as well as bubble help.
- Remarkably wide range of tools, from opening DOS full-screen to fully programmable OS/2 command line window, to
seamless opening of all four Workplace Shell views of a directory.
- A group of tools is provided which can be optionally added to the Toolbar if desired using the
Setup | Toolbar | Configure window.
- It is also possible to create your own tools to, for example, execute a specific program. Here's how to do it:
- Drop-down the "Launch" tool by doing a left-click.
- Right-click on the last item in the list.
- From the context menu, select "Create Item".
- In the window displayed, select "Regular item" and "After current".
- Click on the "Action" tab.
- If you are creating a command to run an executable, select "Executable Program".
- In the "Parameters" box, insert the parameters required, if any, necessary to start the executable. Note:
Since there is no window for the working directory, you will have to make sure the program you want to start
is listed in the LIBPATH directory.
- Click on the "General" tab, and in the "Title" box, specify a brief title of the program.
- Click on "Built-in" to load one of the icons provided with FileStar/2 into the large square to the left.
- If none of the built-in icons are suitable, then you may have to create your own using a graphics
program or the system icon program. Once have created or located a suitable icon, click on the
"Load File" button, and type its fully specified filename into the combo box displayed.
- Click on the "OK" button at the bottom of the window.
We have reached the end of our overview of this remarkable file manager. If you wish to learn more about FileStar/2,
please post your question on the Forum where either I or Jim Read, the author of FS/2, can answer your question. Better
yet, download download the demo and try out the program yourself.
That is the best way to learn more about a feature-packed program like FileStar/2.
—Walter Metcalf
For Further Reading: Do I Really Need a File Manager?
The author's own description of some of the features in FileStar/2 FileStar/2 Version 3.0 Description
Article from FileStar/2 web site describing some of the features that will be in version when released.
Notes
1 It also possible to stop and start the network software (the "Requester") from FileStar/2, but these are advanced procedures, and not recommended for the average user.
2 The default FS/2 mode is the safer Copy, in contrast with the WPS which uses the more dangerous Move. However FileStar/2's mode of option can be changed to match the WPS here to match the WPS. However, the WPS mode CANNOT be changed, except on the Desktop, but I have wished many times I could change it to the safer Copy.
Unless otherwise noted, all content on this site is Copyright © 2004, VOICE
|
|
 |
|
 |
|
|


